Indesign Why Are Text Boxes Printing in Blue
Setting type using InDesign doesn't have to be about drawing simple square and rectangular boxes. In this tutorial, you'll learn how you can use the actual type to create a custom-shaped text box.
Learn How to Make a Text Box in InDesign on YouTube
If you prefer a video version of this tutorial, we've got you covered. You can learn how to make a custom text box in InDesign from our Envato Tuts+ YouTube channel:

Are you ready to get started? Let's dive into our InDesign text box tutorial.
What You'll Learn in This InDesign Text Box Tutorial
- How to insert a text box in InDesign
- How to convert a text box to a frame
- How to import text within the text box design
- How to change the shape of a text box in InDesign
- How to move anchor points in the text box design
- How to fill the text box with colors
- How to adjust the spacing in the text box design
1. How to Insert a Text Box in InDesign
First, create a new document or open an existing document and add a text box. If you don't know how to insert a text box in InDesign, don't worry, it's simple. Select the Type Tool (T), draw a text box by clicking and dragging, and input the letter you wish to use. I find that using a bold sans serif typeface works best—I'm using Gill Sans Bold.
If you're using a word, make sure you double-check your spelling because once you convert the type to a text box design, it can't be edited. Finally, increase the font size so that the letter fills the majority of the page.


2. How to Convert a Text Box to a Frame
Select the text box frame design that you've just created with the Selection Tool, and then go to Type > Create Outlines (Shift-Command-O). Set the fill and outline to none. If Show Frame Edges view isn't already turned on, go to View > Extras > Show Frame Edges. By doing this, you'll be able to view the outlines of the converted letter.


3. How to Import Text Within the Text Box Design
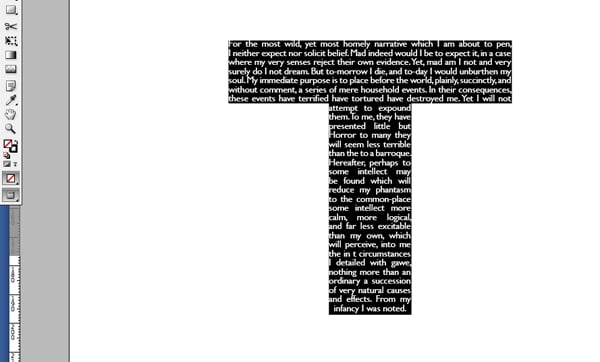
To flow text within the InDesign text box shape, select the Type Tool (T) and click once within the outline, and a blinking cursor will appear. Now import or add your copy and format it to suit your design. I prefer to use a small font size of about 9 pt, justified type, with no hyphenation. (I am using some excerpts from Edgar Allan Poe's The Black Cat for my body text.)


4. How to Change the Shape of a Text Box in InDesign
It's possible that you'll end up with a few ugly paragraph breaks and multiple spaces. To adjust and change the shape of our text box frame in InDesign, select the Direct Selection Tool (A). For my example, I needed to pull up a few anchor points on the underside of the letter. I did this by dragging the connecting line between the two anchor points. When you move a connecting line, InDesign will move the left and right anchors as well.


5. How to Move Anchor Points in the Text Box Design
To move a number of anchor points simultaneously, select the Direct Selection Tool (A), click once on one anchor, hold down Shift, and click again on the other anchor points. You'll notice that the points will change to a solid blue box. Once the anchors have been selected, click one of them and drag. When you do this, the anchors will move in unison.


6. How to Fill the Text Box With Color
Now that you've formatted the copy you might want to add a fill color to the InDesign text box design and select a contrasting color for the type. You'll notice that adding a fill color will force the type to the edge of the frame.

7. How to Adjust the Spacing in the Text Box Design
To amend this, right-click and select Text Frame Options. Adjust the Inset Spacing to add space between the InDesign text box frame and copy. After adjusting the spacing, you might need to alter the text box frame design again as some of the text may have run out of the box design (this is indicated by a red box with a crosshair in its center). Finally, adjust any negative space and balance the measure of the lines.


That's It! Your InDesign Text Box Design Is Finished
Now you know how to make a text box in InDesign with a custom design. We've covered how to convert a text box to a frame, how to change the shape, and how to adjust every detail to get the desired result. Now, it's up to you to play and experiment with the text frame design for your next projects!


Find More Helpful Videos From the Envato Tuts+ YouTube Channel
Did you enjoy this text box frame design tutorial? You can learn a lot more by subscribing to the Envato Tuts+ YouTube channel. Our instructors have created lots of helpful video tutorials about InDesign, Photoshop, and a whole lot more. If you're interested in improving your skills, then check out everything our channel has to offer, like this free course:
Creative Fonts From Envato Elements
Do you know what will pair well with your custom InDesign text box shapes, frames, and designs? One of the awesome fonts available in your Envato Elements subscription. They're professionally designed and can add some extra punch to your next creative project. There are thousands to choose from, so start experimenting!
Conclusion
There you have it. You now know how to insert and create a custom text box in InDesign. You can try this technique out on different letterforms and make different typographical compositions and designs. Have fun and see what you can come up with. You may be surprised by the results.
There's even more to learn about InDesign outside of how to convert a text box to a custom frame. We've got loads of great resources that can help you pick up useful skills all creatives should know. You can even find professional creative templates that will help you express your ideas without spending a lot of time on design:
Source: https://design.tutsplus.com/tutorials/quick-tip-creating-a-custom-text-box-using-type-and-indesign--vector-3974
0 Response to "Indesign Why Are Text Boxes Printing in Blue"
Post a Comment